Validating and binding PeopleEditor and custom SharePoint Editor/Picker controls
In this post we will look at various strategies for validating and binding PeopleEditor and custom SharePoint Editor/Picker controls. PeopleEditor controls are useful in SharePoint for selecting users
In this post we will look at various strategies for validating and binding PeopleEditor and custom SharePoint Editor/Picker controls. PeopleEditor controls are useful in SharePoint for selecting users in custom forms and web parts. Building custom pickers and picker dialogs is also extremely useful, especially when the number of records to search against for whatever you want to pick gets to be very large. PeopleEditor controls are useful in SharePoint for selecting users in custom forms and web parts. Building custom pickers and picker dialogs is also extremely useful, especially when the number of records to search against for whatever you want to pick gets to be very large. I often build custom picker controls when working on top of non-sharepoint data inside of SharePoint, as it fits nicely into the SharePoint UI paradigm. Performing validation and binding on these editor controls can be tricky though. So here are a few options that work for me.
Validating a PeopleEditor control and/or custom Editor control using client-side scripting and a custom validator
In this example, I’m using a custom picker control I built. This validation strategy works for the PeopleEditor control as well. In essence, the custom validator is what triggers validation as it’s hooked into the proper ValidationGroup. The validator then kicks off a ClientValidationFunction called ‘validate_picker’. The validate picker function which is a Javascript function ensures that the picker control has a “resolved” entity (i.e.: entity with a Key). The trick here is to have consistent naming between all these controls so that the validation function works; otherwise, you would have to write a non-generic validation function for each picker you have on a form. In the example below, the “textbox” is NOT necessary, but it can help for binding purposes. The javascript function below will populate the textbox with the picker key value if a textbox exists. The ASPX/ASCX page looks like the following:
<tr className="rgRow">
    <td  nowrap="nowrap">Created By:</td>
    <td>
    <custom:UserPicker ID="pckCreatedById" runat="server" AllowEmpty="True" MultiSelect="False" ValidatorEnabled="True" CssClass="custom-picker" />
    </td>
    <td>
    <span style="color:red;"> * </><asp:CustomValidator ID="val_pckCreatedById" runat="server" ErrorMessage="Required" Enabled="True"
        ClientValidationFunction="validate_picker" ValidationGroup="EditValidations"></asp:CustomValidator>
    <asp:TextBox ID="txt_pckCreatedById" runat="server" Text='<%# Bind("CreatedById") %>' ValidationGroup="EditValidations" CssClass="hidden" />
    </td>
</tr>
And here is the javascript function (which uses jQuery):
function validate_picker(source, args) {
    var validatorId = source.id; // also: $(source).attr("id")
    var textboxId = validatorId.replace('val_pck', 'txt_pck');
    var pickerId = validatorId.replace('val_pck', 'pck');
    var pickerValue = $("#" + pickerId).html();

    if (pickerValue == "" || pickerValue.indexOf('title') == -1 || $("<div>" + pickerValue + "</div>").find("#divEntityData").length == 0) {
        args.IsValid = false;
        return;
    }

    var pickerKey = $("<div>" + pickerValue + "</div>").find("#divEntityData").attr("key");
    if (args.IsValid && $('#' + textboxId)) $('#' + textboxId).val(pickerKey);
}
The PeopleEditor control is a little annoying to work with because it doesn’t support binding very well (IMO) and you have to work around it’s design, so for the following validation and binding suggestions, think possibly of just extending the PeopleEditor control with a custom class, and then you can implement binding and non-client-side validation as shown below.
Validating and binding a custom Editor/Picker control without client-side scripting
In this example, the custom editor/picker control is getting and retrieving data from a custom database, but you could also implement this by extending the PeopleEditor control or using a different persistence mechanism all-together. You add validation using the standard ValidationProperty on your custom picker class, and binding using the standard Bindable attribute on a property of your choice. The property I chose to use is a custom property called “SelectedValue”. My database records have an ID integer field as a primary key, so that’s what I’m counting on for the key value, but I’m using a “string” property return value on my picker instead, as a personal choice, so that I can support the RequiredFieldValidator validation control. You could use an integer instead and then use a RangeValidator if you wanted. The binding mechanism is the same if you extend the PeopleEditor, you just don’t need to do the extra step of checking for an integer value and turning any values less than or equal to 0 into a “string.empty” return value.
[ValidationProperty("SelectedValue")]
 public sealed class UserPicker : EntityEditorWithPicker
 {
     protected override void OnInit(EventArgs e)
     {
         base.OnInit(e);
         this.PickerDialogToolTip = UserPickerHelper.PickerDialogToolTip;
         this.PickerDialogType = typeof(UserPickerDialog);
     }

     [
     Bindable(true, BindingDirection.TwoWay),
     Browsable(false),
     DefaultValue(""),
     DesignerSerializationVisibility(DesignerSerializationVisibility.Hidden),
     Themeable(false),
     Category("Behavior"),
     ]
     public string SelectedValue
     {
         get
         {
             var entity = base.ResolvedEntities.OfType<PickerEntity>().FirstOrDefault();

             if (entity == null || entity.Key.IsNullOrEmpty())
                 return string.Empty;

             int entityKeyId;
             if (int.TryParse(entity.Key, out entityKeyId))
             {
                 if (entityKeyId <= 0)
                     return string.Empty;
             }

             return entity.Key;
         }
         set
         {
             var valueStr = value.NullSafe();

             int entityKeyId;
             if (int.TryParse(valueStr, out entityKeyId))
             {
                 if (entityKeyId <= 0)
                     valueStr = string.Empty;
             }

             base.UpdateEntities(new ArrayList { new PickerEntity { Key = valueStr, DisplayText = "<unresolved>" } });
         }
     }
}
Now, you don’t have to use client-side javascript validation, and you can proceed with using the out-of-the-box asp.net validation controls with your picker controls, such as the RequiredFieldValidator.
<tr className="rgRow">
    <td  nowrap="nowrap">Modified By:</td>
    <td>
    <custom:UserPicker ID="pckModifiedById" runat="server" AllowEmpty="True" MultiSelect="False" ValidatorEnabled="True"
        CssClass="custom-picker" SelectedValue='<%# Bind("ModifiedById") %>' />
    </td>
    <td>
    <span style="color:red;"> * </>
    <asp:RequiredFieldValidator ID="val_pckModifiedById" ControlToValidate="pckModifiedById" ValidationGroup="EditValidations"
        Display="Dynamic" ErrorMessage="Required" runat="server" />
    </td>
</tr>
Final output
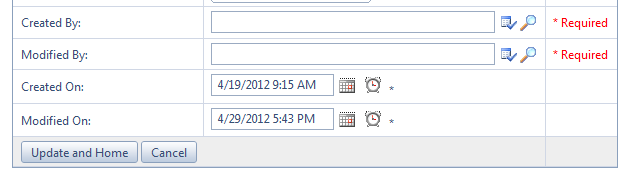
The final product looks like the following, when validation is triggered. The first field “Created By” uses the 1st methodology in this post, and the 2nd field “Modified By” uses the 2nd methodology in this post.
 And when validation passes, it looks as follows:
 Thanks for reading, and have fun coding.
Comments
Comments are moderated. Your email is never displayed publicly.